Mountain Drawing Unbelievably Easy with this Tutorial
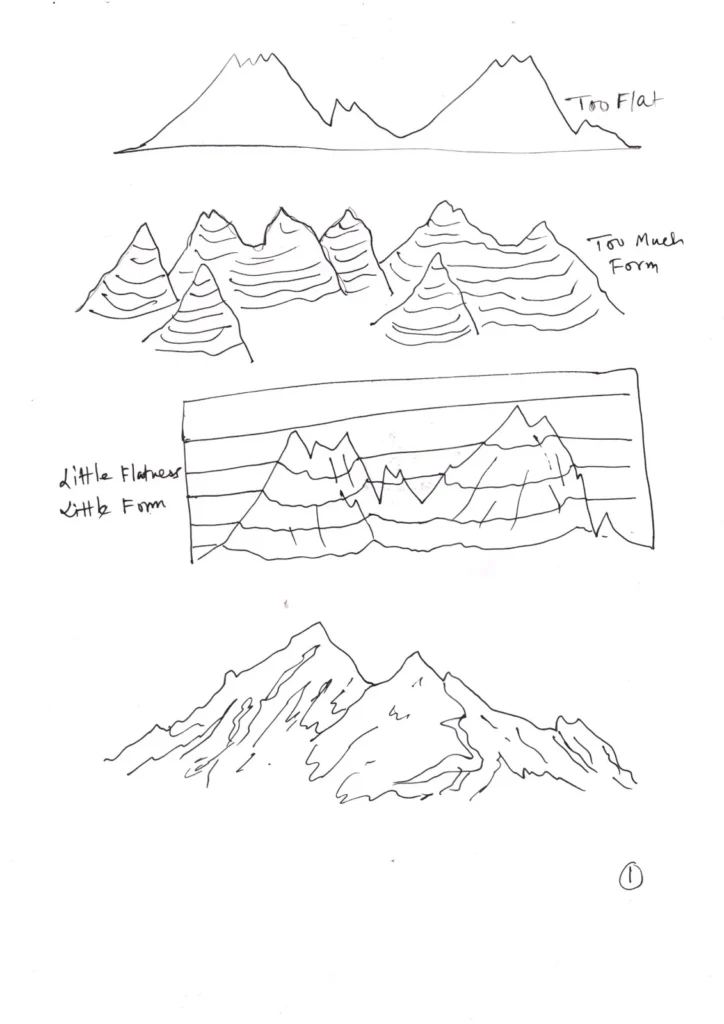
Drawing interesting mountain shapes are a few steps away from you now. Not only that, learn adding the dramatic elements of nature and a sense of randomness also, with this quick and useful tutorial. You have to learn to think while you draw, be it mountain drawing or anything else. Don’t think too flat or don’t try to create too much form. Try to keep it kind of a bas-relief, that means a constructive and attractive combination of a little flatness and a bit of form. This is necessary for achieving a compressed perspective, where both distance and form can be felt.
Every great mountain drawing begins with a strong foundation. Instead of meticulously tracing a photograph, focus on capturing the essence of the mountain range’s silhouette. Think in terms of broad, sweeping lines that define the overall shape. Don’t aim for perfection at this stage; these are merely guidelines. Consider the horizon line and how your mountains will interact with it. Will they rise sharply and dramatically, or will they be more gradual and rolling? Experiment with different contours, imagining the underlying geological forces that sculpted these forms over millennia. Remember, the initial outline sets the stage for the entire mountain drawing, so take your time to establish a compelling and dynamic structure.
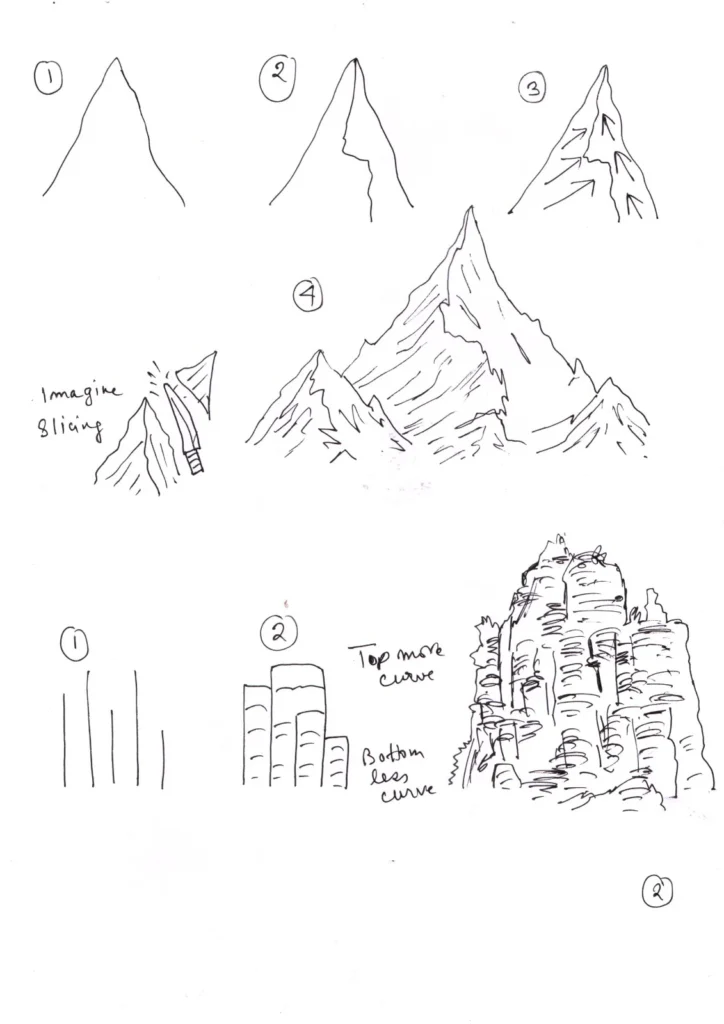
Introducing Variation: The Power of Random Dividing Lines in Mountain Drawing
To avoid a flat and uninteresting mountain drawing, the next crucial step involves introducing random dividing lines across your initial outline. These lines don’t need to follow any strict pattern; in fact, the more irregular they are, the more natural your mountains will appear. Think of them as representing major ridges, valleys, or changes in the rock face. Vary their length, angle, and curvature. These lines will serve as the framework for defining the different planes and facets of your mountains, adding depth and visual complexity to your mountain drawing. Embrace the unexpected and let your hand move freely, guided by an intuitive sense of the terrain.
Defining Form: The Role of Opposing Surface Lines in Mountain Drawing
Once you have your basic outline and random dividing lines in place, it’s time to start suggesting the three-dimensional form of your mountains using opposing surface lines. These are shorter lines drawn roughly parallel to the main dividing lines, but often with slight variations in direction and spacing. They help to indicate the slope and angle of the mountain’s surfaces. On areas that appear to be receding or facing away from a potential light source, these lines can be closer together and darker, suggesting shadow and depth. On surfaces that might catch the light, keep these lines sparser and lighter. This technique adds a sense of volume and solidity to your mountain drawing, moving it beyond a simple two-dimensional representation.
Adding Depth and Detail: Surface Texture and Shadow in Your Mountain Drawing
To further enhance the realism and visual interest of your mountain drawing, the final stage involves adding more surface detail, particularly on the sides of the mountain shapes that fall into shadow. This is where you can introduce subtle textures, suggesting rocky outcrops, scree slopes, or even hints of vegetation. Use a variety of line weights and densities to create a sense of depth and atmosphere. Remember the concept of bas-relief – a balance between flatness and form. Don’t overdo the details to the point where the drawing becomes cluttered. Instead, focus on strategically placing darker tones and textural lines in the shadowed areas to create contrast and emphasize the three-dimensional nature of your mountain drawing.
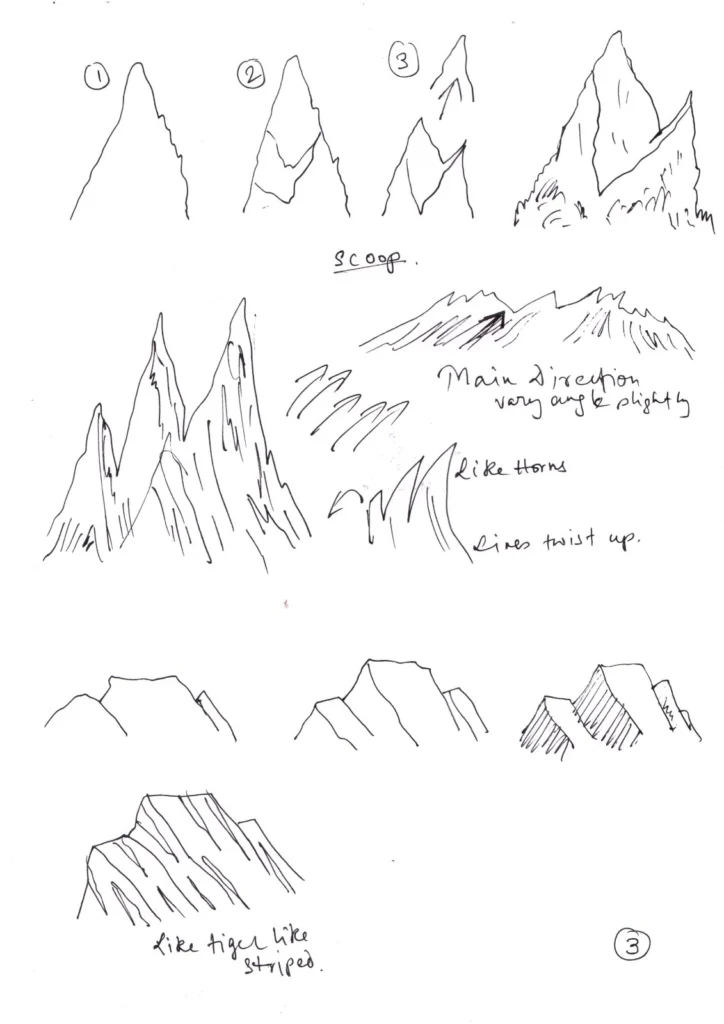
The Scoop on Mountain Shapes: Drawing Dramatic Peaks
For a more dynamic and dramatic mountain drawing, consider the “scoop” method. Start by drawing a random, jagged peak as your focal point. Then, imagine carving out two rough “V” shapes from the sides of this initial form. Finally, remove the very top of the initial peak, allowing the “V” cuts to define the sharp, upward-sweeping edges. Think of your mountain shapes as fractured shards reaching towards the sky. This technique injects a sense of ruggedness and grandeur into your mountain drawing, making your mountain ranges feel more imposing and visually striking.
Embracing Angles and Contours: Creating Realistic Mountain Surfaces
Drawing realistic mountain surfaces requires careful observation and an understanding of how light interacts with their varied forms. Create rough, wedge-like shapes to represent the different facets of the mountain. Crucially, always consider the surface angles as you define these shapes. Areas facing the light will have smoother transitions, while those angled away will exhibit sharper contrasts and cast shadows. Imagine the contours of the land, how they rise and fall, and translate these into your linework. By focusing on these surface angles, you can effectively establish the core structure and make your mountain drawing feel more three-dimensional and believable.
The Illusion of Depth: Drawing Multiple Mountain Ranges
A key element in creating a realistic mountain drawing is understanding that you’re often depicting not just one mountain, but a series of ranges receding into the distance. Always be aware of this basic principle. Vary the positions and heights of these ranges to create a sense of perspective and depth. Mountains in the foreground will typically be larger, with more visible detail and darker tones, while those in the distance will appear smaller, lighter, and with less defined features. Overlapping the ranges can further enhance the feeling of spatial depth in your mountain drawing.
The Power of Negative Space: Shaping Mountains Through Their Absence
Don’t underestimate the importance of negative space in your mountain drawing. The areas surrounding your mountains are just as crucial in defining their shapes. If you can make the shapes formed by the sky or the valleys between the mountains visually interesting and attractive, the mountains themselves will undoubtedly benefit. Consider how the negative space can emphasize the jaggedness of the peaks or the sweeping curves of the slopes. Paying attention to the interplay between positive and negative space can significantly elevate the overall impact of your mountain drawing.
Adding Life and Atmosphere: Surface Pattern Variations and Natural Elements
To truly bring your mountain drawing to life, explore various surface pattern variations. Look at photographs and real-life examples to see the diverse textures found on mountains – from smooth, exposed rock to rough, weathered surfaces. Incorporate these variations into your drawing using different linework techniques. Furthermore, don’t hesitate to add elements of nature to enhance the drama and realism. Suggest tree branches clinging to the slopes, or indicate areas of dense vegetation. Remember to create subtle strata lines in the gaps and exposed rock faces to hint at the geological history of your mountains.
More on how to draw:
- Drawing Magnificent Comic Layout – Things Nobody Told You
- Learn How to Draw Mouth and Lips Like a Pro
- Most Useful Tips for Drawing Clothes
- How to Draw Anime Eyes in 7 Easiest Steps
- Realistic Dragon Drawing is Unbelievably Easy: Step-by-Step Guide
- 5 Easiest Steps for Drawing Chibi Characters
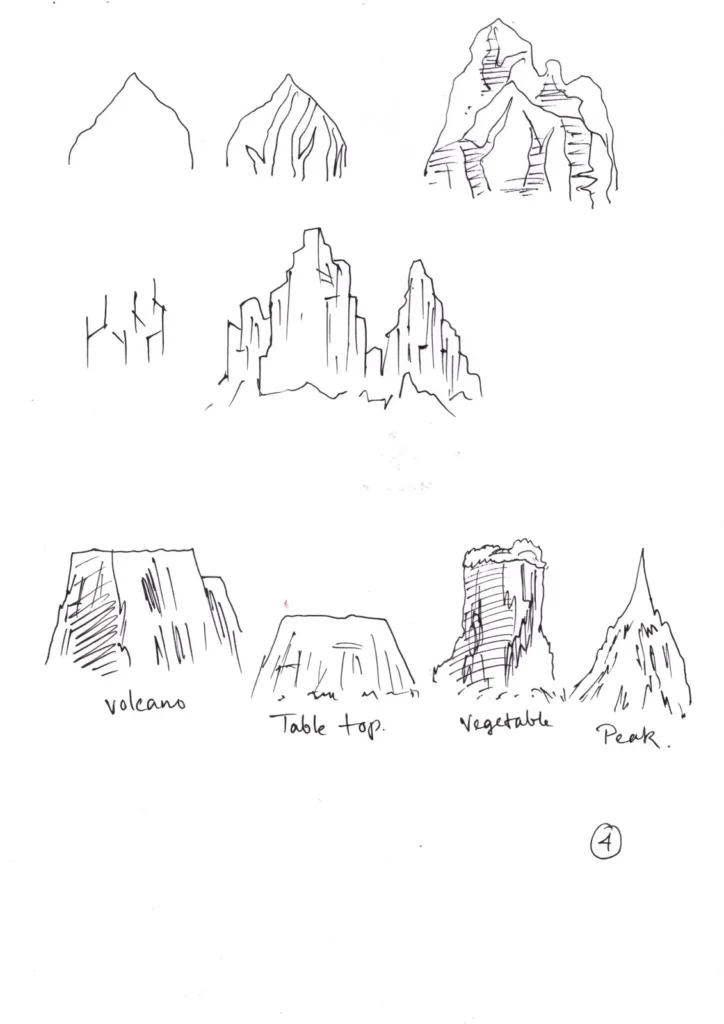
Imagining the Summit: Diverse Mountain Tops and Environments
Mountain tops are incredibly diverse, ranging from sharp, snow-capped peaks to flat, tabletop formations, and even the distinct shapes of volcanoes. Some are barren and rocky, while others are covered in vegetation. Before you begin your mountain drawing, gather references and allow your imagination to run wild. Visualize the specific type of mountain top you want to depict. Start by creating realistic shapes that capture the essence of the summit, and then consider the surrounding environment. Will there be clouds swirling around the peaks? Will there be a sense of vastness and isolation? Adding these environmental details can transform a simple mountain drawing into a captivating and evocative landscape.
By following these steps and continuously observing the natural world, you can develop your skills in mountain drawing and create compelling landscapes that capture the majestic beauty and dramatic power of these natural wonders. Remember to be patient, experiment with different techniques, and most importantly, allow your own artistic vision to guide your hand.


